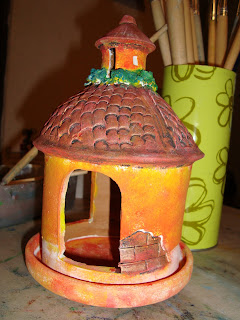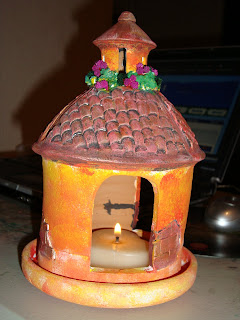
I had to come up with a project for my students to do as a Mother's Day present, it needed to be something relatively simple for the 3 year old bunch, and at the same time something that the kids in 3rd grade could show more creativity with. I used a sponging and a dry brush technique for this model...obviously the 3 year old kids will use a more simple technique.
Here's what I used for this project:
*A medium size clay candle screen, this one measures 8 1/2" by 6"(there are tons of clay objects for sale in the crafts market here)
*White acrylic paint (leftover from the last time we painted the house)
*Student grade acrylic paint (is what the students will have available in school)
*A couple of brushes (they need to have stiff bristles for the dry-brush technique)
*A piece of sponge
*Metallic acrylic paint ( I used some copper)
*Clear adhesive
*Small dry flowers (These are very common here, and come in a variety of colors)
*A styrofoam tray or a plastic plate (To use as a palette)

Ok, I began this project painting all the surfaces with a coat of white acrylic paint, the reason for this is that the clay can be pretty absorbent and if it's left unsealed it can take too many layers of color to get good coverage, the color of the clay also affects the final colors in the project.
 I added black paint to the areas where I will use the dry brush technique; the black will affect the colors I add on top as it will show a bit through the streaks in the top layers, the areas that are left white will be worked with a sponge in different colors to give texture.
 I added a layer of yellow on top of the white and started working in red with some more yellow on top. I don't mind too much if I get paint on top of the black, this will all be covered up later with more paint.
 Here's my sponge and palette so you get a better idea of how I use them; I take a bit of the three colors in the sponge and pat the sponge a bit on the side of the palette so the colors fuse together a bit, when I'm happy with the mix of colors I have I start working on my piece. It's always better to work on light layers to avoid getting splotches of strong color.
 Here are the walls all done after several layers of red/yellow/white paint. This particular house is done in a colonial style which is very common in Antigua Guatemala; some of the main characteristics of these houses are the bold colors of the walls and the Spanish tile roof.
 Here's the first layer of red being applied with the dry brush technique, I picked up some color with the brush and used a sponge to take off as much paint as possible. You can use some paper napkins instead of the sponge, but I prefer the sponge because it absorbs more paint and when I'm finished I just need to rinse it off and leave it to dry.
 Here's the roof after several layers of red and some yellow added, the important thing about using the dry brush technique is to add very light layers of color to give an interesting texture and to use a contrasting color in the background to give it more depth. I added yellow around the top where the flowers will be added.
 Green was added on top of the yellow and white was added to the bottom of the house -not really happy with how the white looks...
 I added some darker green to the area around the top and some white to the roof...which you'll soon discover will disappear... the green was just added in patches while the white was added with the dry brush technique.
 I had my nephew print his hand on the bottom of the dish with red paint, added his name and the date 10-Mayo-2009. Mother's Day in Guatemala is celebrated on May 10th, and all Mother's get the day off. What's nice about this project is that it doesn't matter too much if my boss approves it or not, I made a neat keepsake involving my nephew and I'll always cherish it. By the way, if you look closely the white in the bottom was toned out with some yellow, and a metallic copper tone was added to the roof and the bricks (the camera didn't really picked this up)using the same dry brush technique.
 Here's the final product...I'm still debating whether to paint the inside with white paint since the windows are pretty large and you can see right through it.


